 how-to
Signs of Water Damage Behind Exterior Window Trim
Last Updated: November 7, 2026
Quick Summary
Water damage behind exterior window trim usually shows up as stains or discoloration, peeling or bubbling paint, and soft, spongy, or warped wood. It is often caused by cracked caulk, gaps at trim corners, or failed head flashing that let rain reach bare wood. Indoor signs such as drywall stains or a musty odor mean water has already moved into the wall.
- Press trim with a screwdriver; if it sinks in, the wood may be rotting.
- Check the top corners and head flashing after wind-driven rain for leaks.
- Remove failed caulk before recaulking, since new caulk over it traps moisture.
- Prime the back of replacement trim to prevent water from getting behind it again.
- Call a professional for soft wood several inches deep or any interior water.
Table of Contents
- Why Water Gets Behind Window Trim
- Visible Signs of Water Damage Around Window Trim
- Signs of Moisture Behind Window Trim Inside Your Home
- Causes of Window Leaks and How to Tell Them Apart
- How to Check for Water Damage Behind Siding Step by Step
- How to Repair Rotted Exterior Window Trim
- When to Call a Professional for Window Trim Damage
- Frequently Asked Questions
Water rarely announces itself at a window. It slips behind exterior trim, soaks into the wood, and does its damage out of sight.
Water damage behind exterior window trim is usually the result of small gaps in caulk, paint, or flashing that let rain reach bare wood. Once moisture sits in that wood, it softens the material and invites rot.
Why Water Gets Behind Window Trim
Window trim is built to shed water, but it only works while the seals hold. Rain runs down the wall, hits the top of the window, and needs a clear path away from the frame.
Common entry points include:
- Gaps at the corners where trim pieces meet
- Cracked caulk along the top and sides of the frame
- Failed head flashing above the window
Wood that stays damp for long periods cannot dry out fast enough. That is when rot starts. Checking these entry points before winter is a good idea, since freeze and thaw cycles can make small cracks grow.
Visible Signs of Water Damage Around Window Trim
Look for these signs on the outside of the home first. They are the easiest to spot from the yard or a ladder.
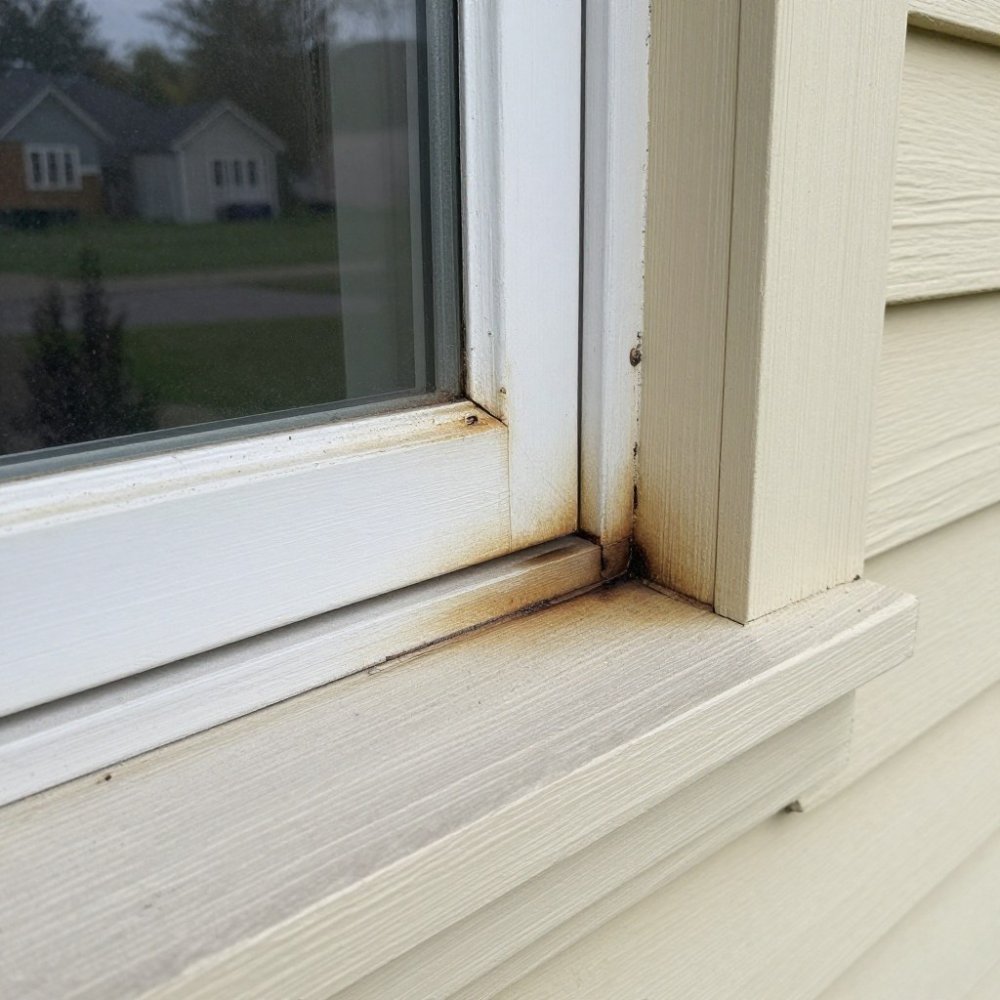
- Water stains or discoloration. Brown, yellow, or gray marks around the window often mean water is running down the trim.
- Peeling or bubbling paint. Paint lifts when moisture gets under it.
- Soft, spongy, or warped trim. Press gently with a screwdriver. If it sinks in, the wood may be rotting.
Any one of these signs deserves a closer look. Two or more together usually mean the problem has been going on for a while.
Signs of Moisture Behind Window Trim Inside Your Home
Some water damage shows up indoors before it does outside. Watch for these signs on the inside walls and window area:
- Stains on the drywall or paint near the window
- Bubbling wallpaper along the window casing
- A musty odor that gets stronger after rain
Indoor signs mean water has already moved past the trim and into the wall cavity. Do not wait on these. Moisture in walls can spread to insulation and framing.
Causes of Window Leaks and How to Tell Them Apart
Not every wet spot near a window comes from trim damage. Condensation, a plumbing leak, roof water, and exterior seal failure can all produce similar symptoms, and the fix is different for each. The fastest way to narrow it down is to record four things: when the moisture appears, where it appears, what the weather was doing, and what the indoor humidity was.
Build a simple diagnostic record
For two weeks, note the following each time you see moisture:
- Timing. Did it appear during or within 24 hours of rain, or on a dry day?
- Location. Is it on the weather-facing side of the window, the interior glass, the casing, the drywall below, or the ceiling nearby?
- Weather. Rain, snowmelt, wind-driven rain, or clear and cold?
A cheap indoor humidity gauge is enough for the last item. Most homes in heating season run between 30 and 50 percent relative humidity; sustained readings above 60 percent indoors point toward condensation as a contributor.
Match the pattern to the likely source
- Rain-related exterior leak. Moisture shows up during or right after storms, usually on the side of the house that faces prevailing weather. The wet area is on the trim, the casing, or the drywall directly below or beside the window. This pattern points to failed caulk, a gap at a trim joint, or failed head flashing above the window.
- Head flashing leak. Water appears at the top corners of the window or on the interior wall above the window after wind-driven rain. Head flashing is the metal or membrane piece that directs water over the top of the window and out to the siding; when it is missing, reversed, or sealed with caulk instead of layered, water gets behind the trim.
- Condensation. Moisture forms on the interior glass, the interior frame, or the cold spots on the casing, mostly in cold months, and clears as the room warms or the fan runs. It is usually spread across the window rather than concentrated at one joint. Condensation is an indoor humidity and ventilation issue, not an exterior seal failure, though long-term condensation can still damage paint and wood.
Test the exterior seal with a controlled hose check
If the pattern points to an exterior leak, a controlled water test can confirm it. Have a helper inside watching the window area. Run a garden hose at low pressure over the top and sides of the window for about ten minutes, starting at the lowest point and working upward.
Watch out: a hose test can push water into a wall that was not leaking before, so keep the flow low, keep the duration short, and stop immediately if water appears inside.
What this rules in and out
The goal is not a perfect diagnosis. It is to avoid resealing trim when the real source is indoor humidity, and to avoid ignoring a flashing problem because the caulk looked fine. If the pattern is mixed or unclear, treat it as an exterior leak until a moisture meter or a professional inspection says otherwise.
How to Check for Water Damage Behind Siding Step by Step
A safe inspection answers three questions: is there damage, how far has it spread, and does it need a professional now? You can answer most of that without removing trim or siding. The steps below are ordered from least invasive to most, and each one has a clear stop point.
Before you start
- Work from the ground with binoculars first. Only use a ladder on level, firm ground, and only in dry, calm weather.
- Have another adult present whenever you are on a ladder.
- Do not pry trim loose, cut siding, or probe deeply into a wall cavity. Those steps can open a sealed assembly to more water and are best left to a professional.
Step 1: Visual scan from the ground
Look at the trim, caulk lines, paint, and the siding joints around each window. Note any staining, peeling, bubbling, gaps, or dark wood. Photograph each window from the same angle so you can compare later.
Step 2: Check the caulk and joints by hand
Press the caulk along the top and sides of the frame with your thumb. Good caulk is firm and bonded. Caulk that is cracked, chalky, or lifts away from the surface has failed. Gently pull a loose edge; if it releases easily, it needs to be removed and replaced, not just topped with new caulk.
Watch out: caulking over failed caulk traps moisture behind the new bead and can make rot worse, so remove the old material first.
Step 3: Probe the trim with a screwdriver
Press the tip of a small screwdriver into the trim and sill at several points, especially at the bottom corners and where trim pieces meet. Sound wood resists. Soft wood that gives way, crumbles, or releases water indicates rot. Mark each soft spot with a pencil so you can map the extent.
Step 4: Use a moisture meter where it helps
A pin-type or pinless moisture meter can tell you whether a suspect area is wetter than surrounding wood. These meters are useful for comparing one spot to another and for tracking whether an area is drying after a repair. They do not tell you how deep the damage goes, whether mold is present, or whether framing is affected. Treat a reading that is clearly higher than nearby dry wood as a reason to investigate further, not as a final diagnosis.
Step 5: Inspect the interior side
Inside the home, check the drywall, paint, wallpaper, and sill near each window. Look for stains, bubbling, soft spots, and musty odor. A musty smell that strengthens after rain is a strong signal that moisture is trapped in the wall assembly. Press gently on the drywall below the window; soft or crumbly drywall means water has moved past the trim.
Step 6: Note what you find and decide on escalation
Record the location, size, and severity of each finding. Use these criteria to decide what happens next:
- Monitor and maintain. Small areas of failed caulk, no soft wood, no interior signs. Clean, reseal, and repaint, then recheck after the next heavy rain.
- Repair soon. Soft wood limited to the trim surface, peeling paint, or a confirmed exterior leak with no interior symptoms. Plan a repair within a few weeks and keep the area dry in the meantime.
- Call a professional promptly. Soft wood several inches deep, water reaching the interior, stains or damp drywall inside, multiple windows affected, or flashing that needs replacement. These point to damage inside the wall that a surface repair will not fix.
What this inspection cannot tell you
A surface inspection cannot confirm whether framing, insulation, or sheathing behind the trim is wet. If the exterior signs are limited but the interior signs are present, the wall cavity is the likely problem and a professional moisture assessment is the next step.
The inspection steps below move from least to most invasive, with a clear stopping point for each.
| Step | What to do | Stop and escalate if |
|---|---|---|
| 1. Visual scan | Check trim, caulk, paint and siding joints from the ground | Staining, peeling, bubbling or dark wood is visible |
| 2. Caulk check | Press caulk by hand and pull loose edges | Caulk releases easily or is cracked or chalky |
| 3. Trim probe | Press a screwdriver into trim and sill at several points | Wood gives way, crumbles or releases water |
| 4. Moisture meter | Compare suspect spots with nearby dry wood | Reading is clearly higher than surrounding wood |
| 5. Interior check | Inspect drywall, paint and sill inside | Stains, bubbling, musty odor or soft drywall |
| 6. Decide next step | Record findings and choose a response | Soft wood several inches deep or interior water present |
How to Repair Rotted Exterior Window Trim
Small problems can often be handled by a homeowner with basic tools. Larger rot usually needs a skilled repair.
For minor surface damage, scrape loose paint, dry the area, fill small gaps with exterior wood filler, sand smooth, prime, and repaint.
For soft or rotted wood, the steps usually include:
- Cutting out the damaged section back to solid wood
- Treating the surrounding wood to slow further decay
- Fitting a new piece of trim or a wood-epoxy repair
Priming the back of replacement trim is a step some DIY repairs skip, and water that gets behind new wood can cause the same problem again.
When to Call a Professional for Window Trim Damage
Call for help when the damage is more than surface-level. Good reasons to hire a licensed and insured handyman include:
- Wood that is soft several inches deep
- Water stains or damp drywall inside the home
- Multiple windows showing signs of leaks
Handyman Service Aurora provides free estimates for home repair projects across Aurora and the Denver Metro area. Call 720-989-4123 for a free estimate before small leaks become costly rot.
Water damage behind window trim is easier to fix when you catch it early. Check the paint, caulk, and wood every season, and act on soft spots or indoor stains right away.
Frequently Asked Questions
Does homeowners insurance cover water damage around windows?
Coverage depends on the policy and the cause. Many standard homeowners policies cover sudden water damage, such as a burst pipe or storm-driven rain entering through an opening the storm created. They typically exclude gradual damage from long-term leaks, rot, or lack of maintenance. Check your policy wording and ask your insurer specifically about exterior trim and window leaks. Document the damage with dated photos before any repairs so you have a clear record if you file a claim.
How can I tell if the wood behind window trim is rotting?
Press a screwdriver into the trim in several spots. Sound wood resists, while rotted wood feels soft, spongy, or crumbly, and the tip may sink in easily. Look for darkened or gray wood, cracks, and paint that peels or bubbles. Rot that reaches the interior side of the trim is more serious. If the damage is extensive or you find it near the window frame or sill, have a professional assess the extent before deciding on repairs.
What could be causing water to leak through my window trim?
Common causes include failing exterior caulk, a damaged or missing head flashing above the window, and paint that has broken down, letting water soak into bare wood. Clogged sill drainage and gaps where the trim meets siding also let water in. Watch whether leaks appear during rain, wind-driven storms, or after the sprinkler runs, which helps narrow down the source.
How do you check for hidden water damage around a window?
Start from the outside by inspecting caulk, paint, and the joints where trim meets siding. From inside, look for stains, peeling paint, or a musty smell on the wall near the window. A moisture meter can help you compare readings across areas, and gently probing suspect trim with a screwdriver reveals soft wood. If the trim is soft, has rot, or the readings are high in several places, bring in a qualified contractor to open the area and confirm the extent of the damage.